So you want to make a theme for Magento?
You picked a tough gig, Chap.
When I first began learning Magento 1.6, I found a lot of outdated or downright wrong information on the right way to create a theme. So I made mistakes. A lot of them. And then I promised myself I would create a (3,000 word) tutorial to help others and spare them the headache.
So consider this your all-inclusive guide to Magento 1.6 theming: from the installation to a finished product.
Installing Magento 1.6.1
This guide will use Ubuntu as the operating system of choice. If you aren’t running a Linux distribution, you may run into some problems that won’t be covered in this guide. Did you know Ubuntu was free? Get it here and run a dual boot, or even run it as a virtual machine.
Using Subversion to Grab The Project
Let’s create the Magento directory we will be working in and then download the project via Subversion.
1 2 3 | $ mkdir /var/www/Magento $ cd /var/www/Magento $ svn checkout http://svn.magentocommerce.com/source/branches/1.6/ |
$ mkdir /var/www/Magento
$ cd /var/www/Magento
$ svn checkout http://svn.magentocommerce.com/source/branches/1.6/
It’s possible the above URL will change. A minor release may come about or the branch will be moved. In that case, you may find details you need on the Magento SVN page.
Creating The Database
Magento uses MySQL for its database. You will need MySQL installed and change out the username to fit your own. I’m using a super user, so in your case you might have to create your own Magento user and assign privileges accordingly.
1 2 | $ mysql -u root -p mysql> CREATE DATABASE magento; |
$ mysql -u root -p
mysql> CREATE DATABASE magento;
Setting Up The Virtual Host
We will be accessing the project through the http://magento.local/ path. First we tell Ubuntu to redirect any traffic to that domain to our localhost, then setup Apache to handle the request.
1 | sudo gedit /etc/hosts |
sudo gedit /etc/hosts
Add this line:
1 | 127.0.0.1 magento.local |
127.0.0.1 magento.local
Now create a virtual hosts file that tells Apache how to handle our request. 000-default is probably already in your Apache2 folder. If you don’t have any other vhosts setup, you’ll want to create 001-magento.
1 2 | cd /etc/apache2/sites-enabled/ sudo gedit 001-magento |
cd /etc/apache2/sites-enabled/
sudo gedit 001-magento
Add this to the file:
1 2 3 4 5 6 7 8 9 10 11 12 13 14 15 16 17 18 19 20 21 22 23 24 | <VirtualHost *:80> ServerAdmin webmaster@localhost ServerName magento.local DocumentRoot /var/www/Magento/1.6/ <Directory /> Options FollowSymLinks AllowOverride All </Directory> <Directory /var/www/Magento/1.6/> Options Indexes FollowSymLinks MultiViews AllowOverride All Order allow,deny allow from all </Directory> ErrorLog ${APACHE_LOG_DIR}/error.log # Possible values include: debug, info, notice, warn, error, crit, # alert, emerg. LogLevel warn CustomLog ${APACHE_LOG_DIR}/access.log combined </VirtualHost> |
<VirtualHost *:80>
    ServerAdmin webmaster@localhost
        ServerName magento.local

    DocumentRoot /var/www/Magento/1.6/
    <Directory />
        Options FollowSymLinks
        AllowOverride All
    </Directory>
    <Directory /var/www/Magento/1.6/>
        Options Indexes FollowSymLinks MultiViews
        AllowOverride All
        Order allow,deny
        allow from all
    </Directory>

    ErrorLog ${APACHE_LOG_DIR}/error.log

    # Possible values include: debug, info, notice, warn, error, crit,
    # alert, emerg.
    LogLevel warn

    CustomLog ${APACHE_LOG_DIR}/access.log combined
</VirtualHost>Restart Apache and check it out!
1 | sudo service apache2 restart |
sudo service apache2 restart
If things went well you should see the install. The install process is simple, so let’s skip to setting Magento up for development.
Set Magento Up For Development
Developing on Magento is a pain if you are using the settings for the production environment. Let’s make development easy on ourselves!
File Ownership and Permissions
Since we are working on development, we can skip some headaches from permissions and ownership issues:
1 2 | $ cd /var/www/ $ sudo chmod -R 777 Magento |
$ cd /var/www/
$ sudo chmod -R 777 Magento
Check the owner of the files, and recursively use chown if necessary.
Disable The Cache
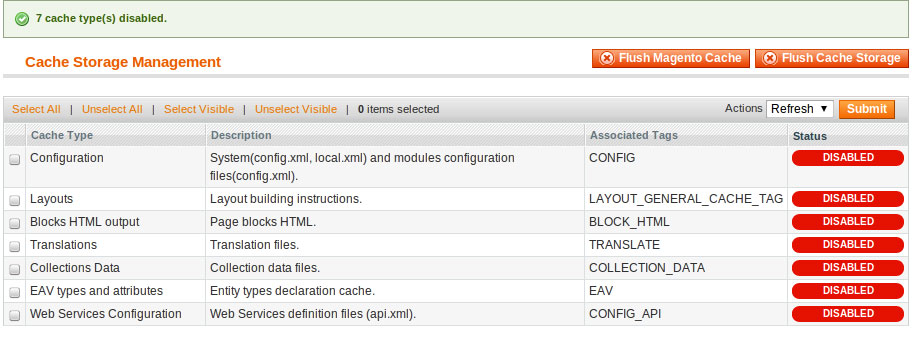
It’s fantastic that Magento comes with the ability to cache everything and anything, but this is poor for development. Save yourself from clearing the cache on each change by disabling it completely.
- Go to System -> Cache Management
- Select all and disable
- Success!
Enabling Errors
When something goes wrong we want to know about it. In your index.php file simply uncomment line 70:
1 | ini_set('display_errors', 1); |
ini_set('display_errors', 1);Starting Our Theme Development
There are two main parent directories that will be used to run a theme.
- /app/design/frontend/ – This contains all the logic and markup for your theme.
- /skin/frontend/ – This contains all the styles, javascript, and images for your theme.
Look around a bit. There are a lot of files! It may seem easier to copy an existing theme and hollow it out to make your own. This is a bad idea: there will be quite a bit of excess code, and you won’t learn the Magento theme structure as you should.
Create a New Package
Before we get started, a word of caution: never edit the base package. It contains all the fallback files that are used when Magento can’t find a certain file. In addition, a Magento update will overwrite changes to the base package.
A package may contain a number of themes. For instance, you will see the default package has a default and modern theme. If you wanted you could create a new theme inside the default package, but we are rolling our own named Vacancy:
- Create the package templates folder: /app/design/frontend/vacancy-package/
- Create the package styles folder: /skin/frontend/vacancy-package/
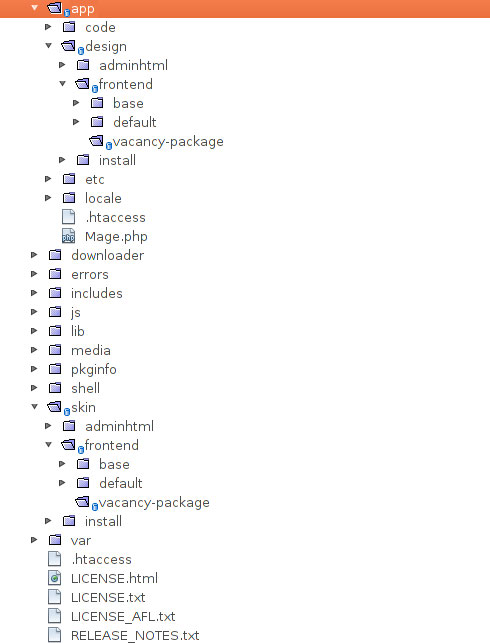
Alright chief, this is your directory structure so far:
Create A New Theme
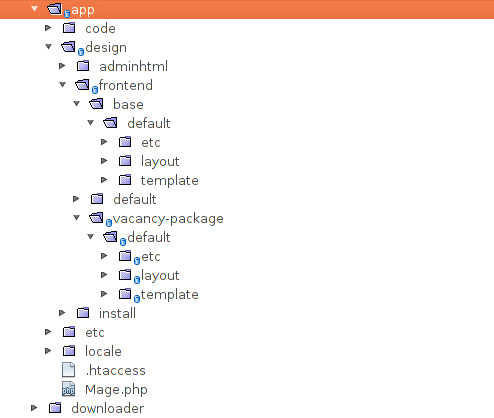
You may have multiple themes for each package. Our package will actually have two themes: default and vacancy-theme. The base package works as a great fallback, but we will be copying the default theme to our own package. Then we won’t have to touch any files that aren’t pertinent to our project.
Copy from and to:
1 2 | /app/design/fontend/base/default/ /app/design/frontend/vacancy-package/default/ |
/app/design/fontend/base/default/
/app/design/frontend/vacancy-package/default/
Excellent. Now if Magento can’t find a file, it will use our package’s default theme to find it. Just like the base package, you shouldn’t edit this theme.
No need to copy over your styles and images: we will be using our own basic design for this tutorial.
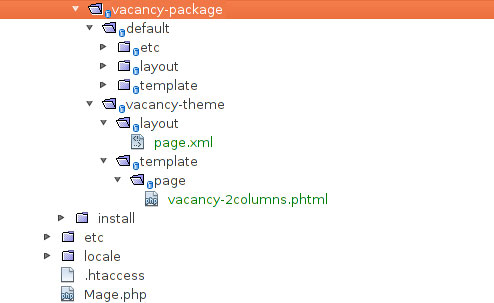
The game so far:
Enabling The New Package and Theme
Magento doesn’t yet know we want to use our own package and theme — let’s tell it!
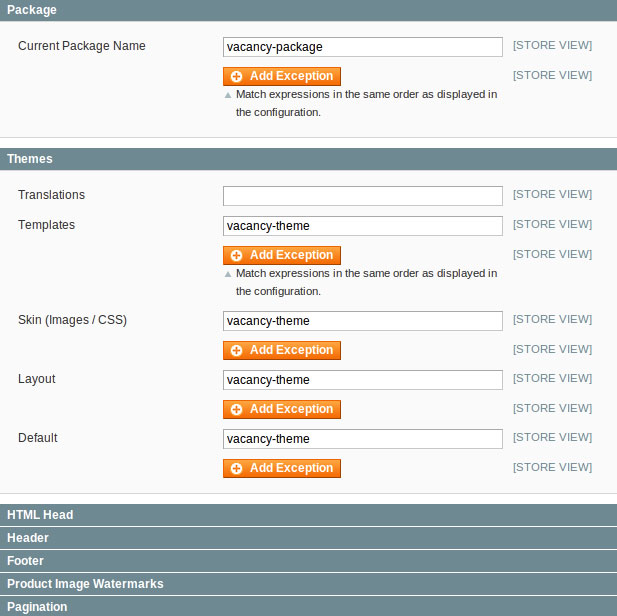
- Go to System -> Configuration
- Go to General -> Design
- Add in our package and theme like so:
Refresh the home page and you will see an un-styled beast of a theme. Let’s get Vacancy styled, shall we?
Creating The Homepage
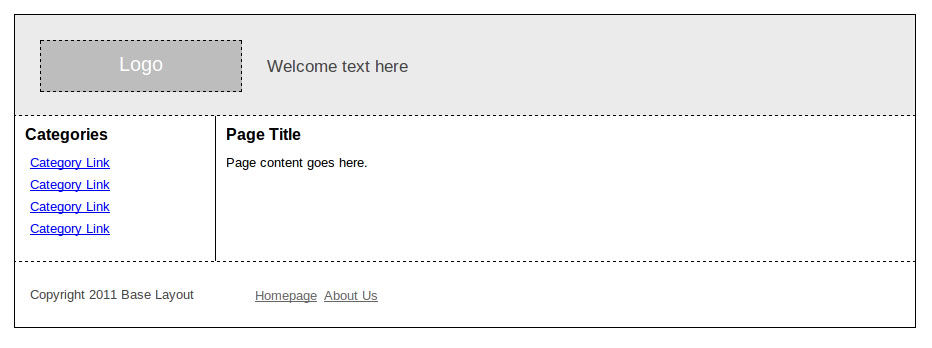
The base theme we are working with is dubbed Vacancy. It’s a high-end design, as you can see:
Alright, maybe not high end, per se, but for our purposes it will explain the concept of themes famously.
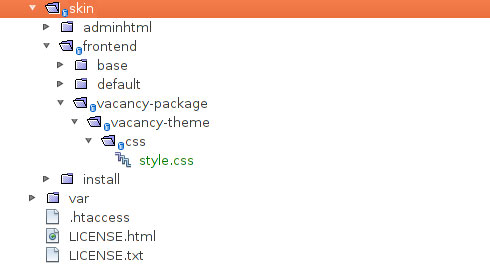
Your skin directory should look like this once you plop in the CSS file:
You won’t directly use the index.php file, but you should still take a good look at it. It gets chopped up into sections, modules, and blocks before we are able to use it in our actual theme.
Working With Magento XML Layout Files
Magento uses XML files to pass important layout information to our view. This could include a module, template file locations, or adding Javascript files to our header.
In the default theme, you will see three major folders:
- etc
- layout
- template
We are concerned with the layout and template folders. Layout contains the XML files, while the template folder contains PHTML files.
The XML files structure the content by blocks, while the PHTML files contain our actual markup. This should be more clear when we work with these files more.
To get an idea of this concept, open two files from the default theme:
- /layout/page.xml – This contains the mentioned structural code. Our own page.xml will be drastically simplified.
- /template/page/2columns-left.phtml – This contains markup for one of the default layouts, which has two columns and a left sidebar. As you can see, Magento simplifies the layout to a great extent by allowing for blocks and sections to be included as needed.
Let’s create our own page.xml file — this will be the default fallback for all pages. Ours will be a hollowed-out version of the version you just saw:
/app/design/frontend/vacancy-package/vacancy-theme/layout/page.xml
1 2 3 4 5 6 7 8 9 10 11 12 13 14 15 16 17 18 19 20 21 22 23 24 25 26 27 28 29 30 31 32 33 34 35 | <layout version="0.1.0"> <!-- Default layout, loads most of the pages --> <default translate="label" module="page"> <label>All Pages</label> <block type="page/html" name="root" output="toHtml" template="page/vacancy-2columns.phtml"> <!-- Add Styles to Head --> <block type="page/html_head" name="head" as="head"> <action method="addCss"><stylesheet>css/style.css</stylesheet></action> </block> <!-- Our Header --> <block type="page/html_header" name="header" as="header" translate="label"> <label>Header</label> </block> <!-- Our Sidebar --> <block type="catalog/navigation" name="sidebar" as="sidebar" translate="label" template="catalog/navigation/sidebar.phtml"> <label>Sidebar</label> </block> <!-- Main Content Area --> <block type="core/text_list" name="content" as="content" translate="label"> <label>Main Content Area</label> </block> <!-- The Footer --> <block type="page/html_footer" name="footer" as="footer" template="page/html/footer.phtml"> <label>Footer</label> </block> </block> </default> </layout> |
<layout version="0.1.0">
<!--
Default layout, loads most of the pages
-->
    <default translate="label" module="page">
        <label>All Pages</label>
        <block type="page/html" name="root" output="toHtml" template="page/vacancy-2columns.phtml">

            <!-- Add Styles to Head -->
            <block type="page/html_head" name="head" as="head">
                <action method="addCss"><stylesheet>css/style.css</stylesheet></action>
            </block>

            <!-- Our Header -->
            <block type="page/html_header" name="header" as="header" translate="label">
                <label>Header</label>
            </block>

            <!-- Our Sidebar -->
            <block type="catalog/navigation" name="sidebar" as="sidebar" translate="label" template="catalog/navigation/sidebar.phtml">
                <label>Sidebar</label>
            </block>

            <!-- Main Content Area -->
            <block type="core/text_list" name="content" as="content" translate="label">
                <label>Main Content Area</label>
            </block>

            <!-- The Footer -->
            <block type="page/html_footer" name="footer" as="footer" template="page/html/footer.phtml">
                <label>Footer</label>
            </block>
        </block>
    </default>
</layout>It’s a good time to review blocks. In Magento, blocks serve the purpose of grouping together items in your template.
In our case, our blocks are the head, header, sidebar, content area, and the footer.
You will notice that the root block references a template file, vacancy-2columns.html. Let’s create that now.
/vacancy-theme/template/page/vacancy-2columns.phtml
For now just put the contents of our index.php file you downloaded earlier and save it.
Refresh the page.
Doesn’t work too well, does it? That’s because the homepage in Magento is currently a CMS page. In your admin panel:
- Go to CMS -> Pages
- Go to Homepage -> Design
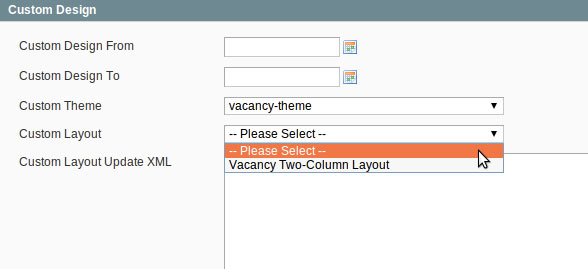
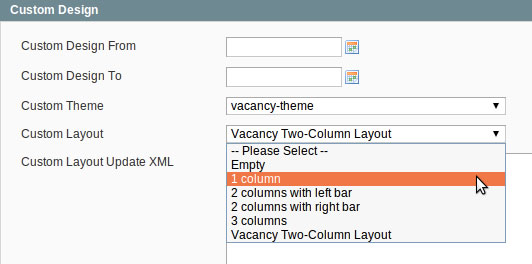
In the dropdown to select the design for the homepage you will note our theme and package is there, but our layout isn’t. The dropdown is being populated by an XML file so it isn’t dynamic.
And now more bad news: editing this dropdown isn’t as easy as you would think.
Setting Template Layouts for CMS Pages
There are two methods of altering your CMS page layouts.
Creating a module is the accepted way, but by simply making a module we won’t be able to remove the base layouts from the list. Not a big deal, but for the OCD impaired it’s sure painful.
Extending a core Magento file is the second way, and it has the benefit of giving you full control of what is in the list. The problem is that we are extending a configuration file — this is generally looked down upon because upgrades might significantly change the file. That means work will have to be done to update your installation before upgrading. This is somewhat a non-issue: if you have extended core files, you should already know that you’ll have to take a look at them before upgrading.
We’ll go through both methods since they both teach valuable lessons. Afterward you may decide which you want to side with.
Method One – Extending Magento Core Code
Magento keeps it’s base code in /code/core/Mage/. Do not ever modify these files directly. Your changes will be overwritten when you upgrade Magento. Instead, we have to extend the core files.
The files we want are located in:
- /app/code/core/Mage/Page/etc/config.xml
- /app/code/core/Mage/Page/etc/system.xml
Copy both of these over to a new path:
- /app/code/local/Mage/Page/etc/
Look at the config.xml file and you’ll see how templates are being built. Just remove the <layouts> code and put the following in:
/app/code/local/Mage/Page/etc/config.xml
1 2 3 4 5 6 7 8 9 | <page> <layouts> <vacancy_two_columns module="page" translate="label"> <label>Vacancy 2 Columns</label> <template>page/vacancy-2columns.phtml</template> <layout_handle>page_vacancy_two_columns</layout_handle> </vacancy_two_columns> </layouts> </page> |
<page>
    <layouts>
        <vacancy_two_columns module="page" translate="label">
            <label>Vacancy 2 Columns</label>
            <template>page/vacancy-2columns.phtml</template>
            <layout_handle>page_vacancy_two_columns</layout_handle>
        </vacancy_two_columns>
    </layouts>
</page>We don’t actually modify system.xml. Since there will be no fallback, we have to include all original files whether we modify them or not.
Now let’s tell Magento to use our local code instead of the core code! Find Mage_All.xml here:
- /app/etc/modules/
Find the Mage_Page block and tell it to use local code like so:
/app/etc/modules/Mage_All.xml
1 2 3 4 5 6 7 | <Mage_Page> <active>true</active> <codePool>local</codePool> <depends> <Mage_Core/> </depends> </Mage_Page> |
<Mage_Page>
    <active>true</active>
    <codePool>local</codePool>
    <depends>
        <Mage_Core/>
    </depends>
</Mage_Page>If all went well you may now go to your CMS Homepage settings and use our theme:
Refreshing the homepage, you should see that we are now using the new layout. The CSS shouldn’t load correctly at this point. We’ll get to that after reviewing the second method of changing CMS layouts.
Method 2 – Creating A Magento Module
Creating a module is easy. We create a new XML file in /etc/modules/ named Vacancy_CMSTemplates.xml.
Fill your XML file with the following code:
/etc/modules/Vacancy_CMSTemplates.xml
1 2 3 4 5 6 7 8 9 10 11 12 | <?xml version="1.0"?> <config> <modules> <Vacancy_CMSTemplates> <active>true</active> <codePool>local</codePool> <depends> <Mage_Page /> </depends> </Vacancy_CMSTemplates> </modules> </config> |
<?xml version="1.0"?>
<config>
  <modules>
    <Vacancy_CMSTemplates>
      <active>true</active>
      <codePool>local</codePool>
      <depends>
        <Mage_Page />
      </depends>
    </Vacancy_CMSTemplates>
  </modules>
</config>Note that we named the module “Vacancy_CMSTemplates” – this is important to remember as it also tells Magento where our module code will reside. In this case we create our config.xml file at the following:
- /app/code/local/Vacancy/CMSTemplates/etc/config.xml
The XML file will have to tell Magento to add our own layouts to the global scope. All we do is add our same XML layout code like so:
1 2 3 4 5 6 7 8 9 10 11 12 13 14 15 16 17 18 19 | <?xml version="1.0"?> <config> <modules> <Vacancy_CMSTemplates> <version>0.1.0</version> </Vacancy_CMSTemplates> </modules> <global> <page> <layouts> <vacancy_two_columns translate="label"> <label>Vacancy Two-Column Layout</label> <template>page/vacancy-2columns.phtml</template> <layout_handle>vacancy_two_columns</layout_handle> </vacancy_two_columns> </layouts> </page> </global> </config> |
<?xml version="1.0"?>
<config>
  <modules>
    <Vacancy_CMSTemplates>
      <version>0.1.0</version>
    </Vacancy_CMSTemplates>
  </modules>
  <global>
    <page>
      <layouts>
        <vacancy_two_columns translate="label">
          <label>Vacancy Two-Column Layout</label>
          <template>page/vacancy-2columns.phtml</template>
          <layout_handle>vacancy_two_columns</layout_handle>
        </vacancy_two_columns>
      </layouts>
    </page>
  </global>
</config>Before changes take effect we have to edit Mage_All.xml again and tell it to use the core code instead of our extension:
/app/etc/modules/Mage_All.xml
1 2 3 4 5 6 7 8 9 10 11 12 | <?xml version="1.0"?> <config> <modules> <Vacancy_CMSTemplates> <active>true</active> <codePool>core</codePool> <depends> <Mage_Page /> </depends> </Vacancy_CMSTemplates> </modules> </config> |
<?xml version="1.0"?>
<config>
  <modules>
    <Vacancy_CMSTemplates>
      <active>true</active>
      <codePool>core</codePool>
      <depends>
        <Mage_Page />
      </depends>
    </Vacancy_CMSTemplates>
  </modules>
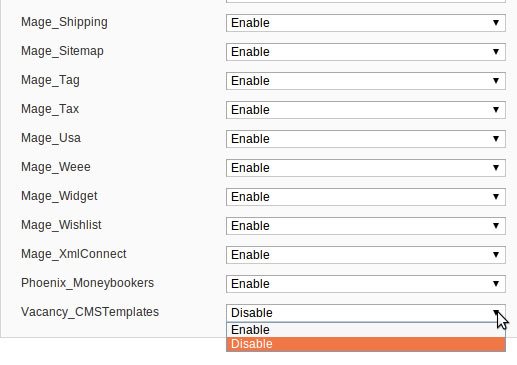
</config>Looking good! It’s also worth noting that if you wanted to quickly disable your changes, you could disable the module in the admin panel instead of removing your code. Oddly, the list of modules is conveniently dynamic! Hmph!
- Go to System -> Configuration
- In sidebar: Advanced -> Advanced
Now just disable it:
.. and that’s a wrap! As for me, I’m fine sticking with the extension method.
Implementing Proper Magento Template Practices
So far we only have a static layout. And one without style, no less. Let’s set up different files for the header, sidebar, content area, and footer.
Create the HTML template folder: /app/design/frontend/vacancy-package/vacancy-theme/template/page/html/
The /html/ folder will house three of the key template files for pages.
- head.phtml – Contains items such as meta info, page title, CSS/JS, and so forth
- header.phtml – Contains header markup such as the logo, header navigation, etc
- footer.phtml – Our footer box at the bottom of the page
Our sidebar doesn’t quite fit under the /page/ templates, so we will create a new folder for the navigation. Create sidebar.phtml at the following:
- /vacancy-theme/template/catalog/navigation/sidebar.phtml
Our Head – head.phtml
All the meta info, helpers, includes and styling files are quite simple to load dynamically, thanks to Magento. The code should be straightforward:
../vacancy-theme/template/page/html/head.phtml
1 2 3 4 5 6 7 8 9 10 11 12 13 14 15 16 17 18 19 | <meta http-equiv="Content-Type" content="<?php echo $this->getContentType() ?>" /> <title><?php echo $this->getTitle() ?></title> <meta name="description" content="<?php echo htmlspecialchars($this->getDescription()) ?>" /> <meta name="keywords" content="<?php echo htmlspecialchars($this->getKeywords()) ?>" /> <meta name="robots" content="<?php echo htmlspecialchars($this->getRobots()) ?>" /> <link rel="icon" href="<?php echo $this->getFaviconFile(); ?>" type="image/x-icon" /> <link rel="shortcut icon" href="<?php echo $this->getFaviconFile(); ?>" type="image/x-icon" /> <!--[if lt IE 7]> <script type="text/javascript"> //<![CDATA[ var BLANK_URL = '<?php echo $this->helper('core/js')->getJsUrl('blank.html') ?>'; var BLANK_IMG = '<?php echo $this->helper('core/js')->getJsUrl('spacer.gif') ?>'; //]]> </script> <![endif]--> <?php echo $this->getCssJsHtml() ?> <?php echo $this->getChildHtml() ?> <?php echo $this->helper('core/js')->getTranslatorScript() ?> <?php echo $this->getIncludes() ?> |
<meta http-equiv="Content-Type" content="<?php echo $this->getContentType() ?>" />
<title><?php echo $this->getTitle() ?></title>
<meta name="description" content="<?php echo htmlspecialchars($this->getDescription()) ?>" />
<meta name="keywords" content="<?php echo htmlspecialchars($this->getKeywords()) ?>" />
<meta name="robots" content="<?php echo htmlspecialchars($this->getRobots()) ?>" />
<link rel="icon" href="<?php echo $this->getFaviconFile(); ?>" type="image/x-icon" />
<link rel="shortcut icon" href="<?php echo $this->getFaviconFile(); ?>" type="image/x-icon" />
<!--[if lt IE 7]>
<script type="text/javascript">
//<![CDATA[
    var BLANK_URL = '<?php echo $this->helper('core/js')->getJsUrl('blank.html') ?>';
    var BLANK_IMG = '<?php echo $this->helper('core/js')->getJsUrl('spacer.gif') ?>';
//]]>
</script>
<![endif]-->
<?php echo $this->getCssJsHtml() ?>
<?php echo $this->getChildHtml() ?>
<?php echo $this->helper('core/js')->getTranslatorScript() ?>
<?php echo $this->getIncludes() ?>Nothing here to change. Remember our page.xml layout block where we added the CSS file? That gets called with the getCssJsHtml helper. Automatic handling of meta tags is nice too.
The Header – header.phtml
Nothing too complex here – just outputting a simple welcome text. It’s set in the administration panel. Kind of useless, but let’s add it anyway:
../vacancy-theme/template/page/html/header.phtml
1 2 3 4 5 6 | <div class="logo floatLeft"> <p>Logo</p> </div> <div class="welcome floatLeft"> <?php echo $this->getWelcome() ?> </div> |
<div class="logo floatLeft">
    <p>Logo</p>
</div>
<div class="welcome floatLeft">
    <?php echo $this->getWelcome() ?>
</div>The Sidebar – sidebar.phtml
For the sidebar we use a Magento helper to load all the categories and then loop through them, displaying them one at a time.
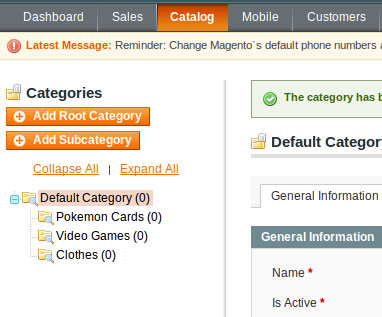
First, however, you need the categories to loop through! The administration panel is easy enough to use, but make certain that the categories you create are under “Default Category” for now. After you are done you’ll see something similar:
Now for the sidebar.phtml file:
../vacancy-theme/template/catalog/navigation/sidebar.phtml
1 2 3 4 5 6 7 8 9 10 11 12 13 | <?php // Load categories and loop through them $cats = $this->getStoreCategories(); ?> <h2>Categories</h2> <ul> <?php foreach($cats as $cat) : ?> <li><a href="<?php echo $cat->getCategoryUrl($cat); ?>"><?php echo $cat->getName(); ?></a> <?php endforeach; ?> </ul> |
<?php

// Load categories and loop through them
$cats = $this->getStoreCategories();

?>

<h2>Categories</h2>
<ul>
    <?php foreach($cats as $cat) : ?>
        <li><a href="<?php echo $cat->getCategoryUrl($cat); ?>"><?php echo $cat->getName(); ?></a>
    <?php endforeach; ?>
</ul>If you want to learn more about helpers like getName, your best bet is to get the class name of the object and search the Magento docs, or to do some sleuthing yourself.
Something like this does famously:
1 | <?php foreach($cats as $cat) : echo var_dump($cat->getData()); exit; ?> |
<?php foreach($cats as $cat) : echo var_dump($cat->getData()); exit; ?>
That will output all of the data from the Varien_Data_Tree_Node object ( which I found by echoing get_class($cat) ), allowing you to easily see what data is accessible. You can get any of the data by calling the proper method. Here’s example output of the data:
1 2 3 4 5 6 7 8 9 10 11 12 13 14 15 16 17 18 | array(16) { ["entity_id"] => string(1) "4" ["entity_type_id"] => string(1) "3" ["attribute_set_id"] => string(1) "3" ["parent_id"] =>string(1) "2" ["created_at"] =>string(19) "2011-11-06 23:23:16" ["updated_at"] =>string(19) "2011-11-06 23:23:16" ["path"] => string(5) "1/2/4" ["position"] => string(1) "1" ["level"] => string(1) "2" ["children_count"] => string(1) "0" ["path_id"] => string(5) "1/2/4" ["is_active"] => string(1) "1" ["include_in_menu"] => string(1) "1" ["request_path"] => string(18) "pokemon-cards.html" ["name"] => string(13) "Pokemon Cards" ["url_key"] => string(13) "pokemon-cards" } |
array(16) {
  ["entity_id"] => string(1) "4"
  ["entity_type_id"] => string(1) "3"
  ["attribute_set_id"] => string(1) "3"
  ["parent_id"] =>string(1) "2"
  ["created_at"] =>string(19) "2011-11-06 23:23:16"
  ["updated_at"] =>string(19) "2011-11-06 23:23:16"
  ["path"] => string(5) "1/2/4"
  ["position"] => string(1) "1"
  ["level"] =>  string(1) "2"
  ["children_count"] => string(1) "0"
  ["path_id"] => string(5) "1/2/4"
  ["is_active"] => string(1) "1"
  ["include_in_menu"] => string(1) "1"
  ["request_path"] => string(18) "pokemon-cards.html"
  ["name"] => string(13) "Pokemon Cards"
  ["url_key"] => string(13) "pokemon-cards"
}If you want the url_key data for the category “Pokemon Cards,” you’d use the following method:
1 | echo $cat->getUrlKey(); |
echo $cat->getUrlKey();
You’ll be diving into code like this often with Magento: the official and community documentation is often outdated or just not helpful.
The Footer – footer.phtml
The footer also contains dynamic content. We will introduce the concept of Static Blocks in this section. A static block is a block that can be edited within the administration menu. In our case we will make the footer links easily edited.
Magento has already created our footer static block for us. You may see them if you go to CMS -> Static Blocks.
../vacancy-theme/template/page/html/footer.phtml
1 2 3 4 5 6 7 | <div class="copyright floatLeft"> Copyright 2011 Base Layout </div> <?php echo $this->getLayout()->createBlock('cms/block')->setBlockId('footer_links')->toHtml(); ?> <div class="clear"> </div> |
<div class="copyright floatLeft">
Copyright 2011 Base Layout
</div>
<?php echo $this->getLayout()->createBlock('cms/block')->setBlockId('footer_links')->toHtml(); ?>
<div class="clear"> </div>The syntax for getting a block from the CMS menu is easy. If you want to include a different block, just switch ‘footer_links’ with the block identifier, which you set in the edit menu for the block.
The Template File – vacancy-2columns.phtml
Now let’s bring it all together. Our template file will piece all of the phtml files we just created together.
../vacancy-theme/template/page/vacancy-2columns.phtml
1 2 3 4 5 6 7 8 9 10 11 12 13 14 15 16 17 18 19 20 21 22 | <!DOCTYPE html> <head> <?php echo $this->getChildHtml('head'); ?> </head> <body> <div id="wrapper"> <div id="header"> <?php echo $this->getChildHtml('header'); ?> <?php echo $this->getChildHtml('test'); ?> </div> <div id="sidebar" class="floatLeft"> <?php echo $this->getChildHtml('sidebar'); ?> </div> <div id="content" class="floatLeft"> <?php echo $this->getChildHtml('content'); ?> </div> <div id="footer"> <?php echo $this->getChildHtml('footer'); ?> </div> </div> </body> </html> |
<!DOCTYPE html>
<head>
    <?php echo $this->getChildHtml('head'); ?>
</head>
<body>
    <div id="wrapper">
        <div id="header">
            <?php echo $this->getChildHtml('header'); ?>
            <?php echo $this->getChildHtml('test'); ?>
        </div>
        <div id="sidebar" class="floatLeft">
            <?php echo $this->getChildHtml('sidebar'); ?>
        </div>
        <div id="content" class="floatLeft">
            <?php echo $this->getChildHtml('content'); ?>
        </div>
        <div id="footer">
            <?php echo $this->getChildHtml('footer'); ?>
        </div>
    </div>
</body>
</html>So this is fairly simple. With getChildHtml we are simply telling the layout to find the block within quotes. If you look at your page.xml file you will see that the names here correspond to the names of each block we created.
The Result
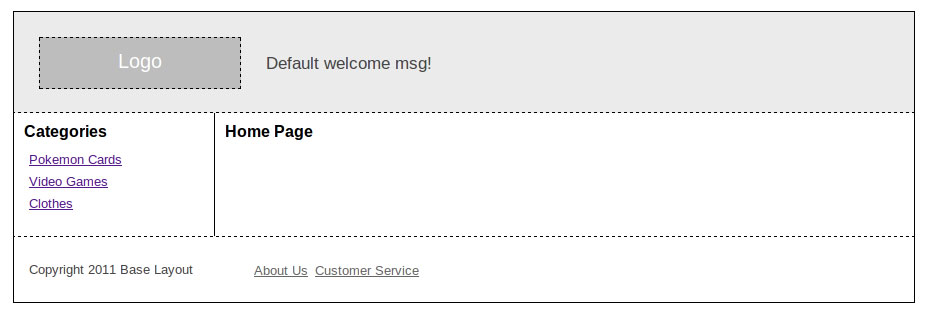
If everything went according to plan, you should have this for a homepage:
You may download the contents of /vacancy-package/ for the skin and app directory here:
vacancy-theme.zip
Continuing Forward
This is a rather long tutorial already, so we’ll stop at this point.
The first thing you should do is become more familiar with the administration panel. Change the Homepage CMS template to show text, look at configuration options, and explore as much as possible.
Next you’ll want to create templates, layout configurations, static blocks, and anything else you want to add to the theme. If you have browsed a category page by now , it wasn’t a pretty sight. You now have the time-consuming task of learning every layout file that Magento uses and properly configuring them for your needs.
A fair warning: the Magento community gives bad advice sometimes, or it’s extremely outdated. From here you absolutely must tinker with the code and experiment by yourself, in addition to asking for help on StackOverflow, #magento on Freenode, or asking directly here. Note that the Magento forums are usually fairly dead and you are unlikely to find answers there.
I made this guide as complete as I thought possible. Please comment on things I should add if you hit a stumbling block.
Good luck, and godspeed in your Magento endeavors!
hard to find documentation all in one spot like this. thanks a lot.
you write like a shekshpear.
you have not given the final form of vacancy-2columns.phtml. As per your tutorial it index.php is copied to it.
You are correct, Ramki. A redditor on the Magento subreddit brought this to my attention Friday and I haven’t updated it yet.
Will do so tonight. Thanks for the feedback! Cheers.
Thanks for a great intro tutorial, it’s true that’s very hard to find concise and accurate help on Magento 1.6.
Are you able include a zipped package of the /app/ and /design/ files used in this tutorial?
This tutorial is easy to understand.Nice work
OnCar
Great tutorial – there’s not much 1.6 tutorials out, thanks again!
Finally a 1.6 tutorial that isn’t a copy and paste of 1.4 without testing.
Great blog piece Zachary, haven’t seen anyone strip Magento down and start again from scratch like that. I find that copying the theme and modifying in my own Package suits my needs, but your method is a great way to actually understand what’s happening behind the scenes.
Great mate !!
Thanks for the kind responses everyone!
@Ken – That’s a good idea. I’ve updated the post with a link to a zip file that contains the /vacancy-package/ folder in /skin/ and /app/ – hope this helps and thanks for the suggestion.
Hi, Thank you very much for this tutorial! I was able to successfully create my very first theme painlessly the first time I did this.
Now, I have tried to modify this theme but I cannot add pictures (site logo, crumbs, png/gif files) no matter what I try … what am I doing wrong?
@Farrenzo – This is by no means a completed theme. You will have to look at the default theme to use methods to get items you need. In the case of the logo, you should look at the template file for the head. It contains a method to get the logo, as set in the backend.
Hope that helps!
Hello
Thanks a lot for this great tutorial targetting 1.6. I am a new bee for magento and i think i got a powerful startup for starting over this area
Thanks again
One note about making new categories work:
1. Make sure the new categories are under “Default Category” or they will not show up.
2. In admin, go to System->Configuration->”Manage Stores” (top of the left column), then edit the item in the “Store Name” column, and set the “Root Category”
This will allow getStoreCategories() to work right in sidebar.phtml
Great tutorial, thanks for sharing. The only issue I had was with the sidebar.phtml – the code that echos the category URL should be “echo $this->getCategoryUrl($cat);”, not “echo $cat->getCategoryUrl($cat);”. The latter was empty for me.
That was something I was looking for. One well written ad as described All Inclusive guide. It was like treasure at the end of hunt for someone newbie like me…thanks a lot mate !! and hoping to see lot more articles on Magento 1.6 here..
Forgot to mention..tat zip file was icing on the cake 🙂
It is one of the great tutorial I found.
However I am not able to add the product in the shopping cart also the theme is not going to apply for the “add to whishlist” and “forgot password” etc…. Can anyone help me to understand where I am wrong?
My above problem has been solved.However, One page checkout page in not working for this cusome theme. Can any one help me in this?
An error occurred while saving this configuration: package with this name does not exist and cannot be set.
how to solve this error?
I tried your “Method 2 – Creating A Magento Module”. But my custom module dose not shown in the system->Configuration–> Advanced. Help!
P.S. I know it is case sensitive. My Module Names are Upper case in the First letter. /Vacancy/Cmstemplates
Hi,
Thanks for your good tutorial.
However, when I try to write my own template/page/home.phtml, magento does not use this file and use its default phtml. The new Layout appears in custom Layout and in sys/config/advanced/advanced modules.
How can I solve this problem?Thx
Here is my config file:
app/code/local/Test/Layout/etc/config.xml:
0.1.0
Test Layout
page/home.phtml
page_home
@myu and Mahsa: Did you download the ZIP file? I would suggest looking at it and doing a diff of what you have. That’d be the easiest method of finding the answer.
Let me know if you need further help!
Very nice tutorial!
Just what I needed, nicely written.
CSS is not loading, I made some mistake, but hey, thats learning!
Thanks!
Zachary,
I cant select the custom layout in the backend:
http://www.tx3.be/error.jpg
I tried your tutorial 3 times on version 1.6.1 and even once on 1.6
And even after copy pasting your files from the zip file below, I still cant select it.
Is it me, or is there some sort of cashing in volved?
Thanks!
I have to admit, I’ve been looking all night for a decent Magento theming tutorial and I think I’ve just found one! Thanks a lot dude!
Awesome tutorial: well-written and easy to understand – would love to see some more along similar lines! Great job!
Just going through it I noticed that under:
Implementing Proper Magento Template Practices
you say to “Create the HTML template folder: /app/design/frontend/vacancy-package/vacancy-theme/page/html/”
I think the folder path should be “/app/design/frontend/vacancy-package/vacancy-theme/template/page/html/” and in fact you use that path just below – I think the first path where the word “template” is missing is just a typo. Might cause confusion, though!
Well done again – keep up the great work.
@Tx3 – Many things could be wrong here. Could you by chance zip up your full installation and send it to me? Use my contact form to ping me, I’ll send you an email back.
@Maff – Well spotted! Thanks very much for your attention to detail. I’ve updated the article; you were correct.
Very Nice tutorial! You explained theming very clearly. Thanqs a lot..
It would be useful to enable dates on comments. I can’t see what order or how old they are.
This seems to be working for everyone else, but I canoot get this thing to work for the life of me. I’ve spent hours.
Under “Enabling The New Package and Theme” are we changing the Defualt Config, Main Website, or Main Website store?
My site is a mess.
/skin/frontend/base/default/css/styles.css 404
/skin/frontend/base/default/images/logo.gif 404
/skin/frontend/base/default/images/media/col_right_callout.jpg 404
/skin/frontend/base/default/css/print.css 404
I found my problem Zack…
You need need to reload your package after installing the extension method, else it doesnt work for me.
You are a king among men. Well done.
I tried following first method ( changing magento code) n magento community edition 1.7, but unfortunately, the layout could not be seen in the drop down ( in home page design – under cms, pages).
I followed all the steps you had mentioned multiple times.
Hi Nishi. This article is a version before 1.7, so unfortunately something must have changed since then. I’ll be writing a guide to theming 1.7 within a month or so. Sorry I’m not more helpful!
thanks man..
best tutorial i ever see in magento
Your tutorial has a typo…
/vacancy-theme/catalog/navigation/sidebar.phtml
should be
/vacancy-theme/template/catalog/navigation/sidebar.phtml
Other than this I have learned a TON from this tutorial. Thank you 🙂
Correct, AJ. I’ve updated the article, thanks so much for taking the time to let me know.
I very much appreciate the comments 🙂
Half way but I am feeling that I can do it, Magento people have made it hard so not many people can learn it seem to me and not given much good tutorial. thanks I am bookmarking you blog. many thanks and please update your blog on magento as much as possible
Zachary,
Great tutorial. I would like to include a custom php script that needs to be called before the head section.
I have created the custom module and config.xml files, but I’m having trouble calling the block right before the head section (the module works fine if I call the block from within the CMS).
Great Tutorial! very helpful for a start.
Everything works on 1.7, I don’t know why someone had a problem with that.
It’s really bad that there is such a small amount of good information/tutorials about magento…
Excellent work on putting this tutorial together. There aren’t many good ones out there!
For anyone having an issue selecting the new custom layout in the CMS, try refreshing or clearing the Magento cache first. Go to System -> Cache Management.
Zach:
Nice work to document all this. Unfortunately I am using the module method for setting template layouts, and can’t get the layout to show up in the CMS > Pages > Home Page > Design section, or in the Advanced module listing.
I’m using 1.7.0.2. Any incompatibilities that you know of? Going mad trying to figure this out, any insight appreciated.
Thanks a lot!
SF
Zach
Great tutorial. Couple of issues, but a quick read through the comments sorted me out.
Everything works (aside from editing magento core).
Thanks!
Would you mind updating the tutorial for 1.7? Extension thingy doesn’t work, as someone already mentioned.
@Dzum
I worked out the tutorialin magento 1.7.0.2 and it works great, including the extension and modules part.
Make sure you edited the Mage_All.xml file asking magento to use local codepool and not the core.
Please do double check for typos.
Awesome tutorial Zac! I greatly appreciate your efforts 🙂 Thank you!
I can’t get the css to load any thoughts on this? using 1.7.0.2 xampp/win7
Great tutor thx
Very nice …:)
Wow, great article/tutorial, dude!
Besides being a very good, well-structured resource I also very much like your writing style. Quite entertaining and keeps one reading. Kudos!
Boss what have you done? I mean,after long hours & days of frustration when something like this come up, one just feel he has got everything.I am just feeling that right now.
This has to be the best & probably the only complete tutorial on magento theme development that I have come across.Thanks a ton.
Thanks a lot. This sure is the one and only working tutorial. Great stuff!
This is a nice tutorial. But there is something which you might want to include. If you do a custom theme it is considered good practice to use one ../design/../../../layout/local.xml in which ALL changes are made. This file is always loaded last and all changes overwrite all previous changes. So if you do changes in an .xml file you do it only in local.xml never copy .xml files from the default directory.
This is easier to maintain, because everything is in one place.
The issue reported here on theme not appearing under 1.7 is nothing to do with that. The instructions for extension say to put the Vacancy_CMSTemplates.xml in /etc/modules/
There is no such directory from the root. So if like me the first time you created this then it does not work. The file Vacancy_CMSTemplates.xml should actualy be in /app/etc/modules/ and then it all works just fine.
Thanks for the great tutorial.
@Zach:
I’m planning to follow this tutorial, it seems to be the best one on the web, but I’m going to use Magento 1.7.1. Do you think it’s a good idea to start getting more familiar on theming with magento 1.6. Or is it such a big difference on theming between Magento 1.6 and 1.7.1 that it should better to start with 1.7.1?
Thanks a lot for creating this tutorial, respect!
I just want to say thank you. The documentation on magento is rubbish and outdated. I tried 10 different ways to make a theme out of this design I created for a client and failed 12 different ways. This one worked. My theme is far from complete, but at least I understand what Magento is expecting and know how to make it work for me.
Thank you!
Thanks,
one of the best guides on themes on the net for Magento.
Great Stuff !!! Thanks for such an elaborate yet simple guide.
I also faced some issues with the extension and the module thing in v1.7, but once you refresh the Magento Cache Storage Management, its all fine.
Hi Zachary,
Thank you for the tutorial. It give me a nice Kick off for Magento theming and have save me a lot of time!
Cheers mate!
Hi Zachary,
I found you tutorial very much concise, upto the point and very helpful.I didn’t see any tutorials like yours before this. It helped me a lot.
Thanks one more time mate!
This is a seriously good guide, thanks for sharing. Your process and explanation is great.
[…] I cannot seem to find up to date tutorials for creating own themes from scratch for the current release of Magento, can anyone point me to one? The most comprehensive I know which but is a little out of date is this […]
For those having problem with the css, you must add the following to the top of vacancy-2columns.phtml file :
getChildHtml(‘head’) ?>
Brilliant, I have always avoided Magento because of what i consider its steep learning curve, this post has made sense of the basics, once you grasp the basics then the rest falls into place as a matter of course.. Top Marks to you sir!
I was searching for complete magento tutorial which learn from the scratch over two days but couldn’t find one till I read your tutorial . It is really nice and worked like a champ. Hope you will write another article for the latest version of magento at the moment it is 1.9.0.1 . Thank you again 🙂